
유진의 코딩스토리
Yolo 객체 탐지 실습 본문
import cv2
import gradio as gr
import numpy as np

weights_path = "yolo3/yolov3.weights"   # YOLO 가중치 파일 경로 설정
config_path = "yolo3/yolov3.cfg"    # YOLO 구성 파일 경로 설정
names_path = "yolo3/coco.names"     # COCO 클래스 이름 파일 경로 설정

# YOLO 모델을 불러옴
net = cv2.dnn.readNet(weights_path, config_path)

# 라벨 로드
with open(names_path, 'r') as file:
    labels = file.read().strip().split('\n')   # COCO 클래스 이름을 리스트로 읽어옴
    print('Labels Length: ', len(labels), labels)    # 라벨 개수와 라벨 리스트 출력


def stream_webcam(image):
    return image

with gr.Blocks() as demo:
    webcam_input = gr.Image(label="카메라", sources="webcam", streaming=True, width=480, height=270, mirror_webcam=False)
    output_image = gr.Image(label='검출 화면')

    webcam_input.stream(fn=stream_webcam, inputs=[webcam_input], outputs=[output_image])

demo.launch()
YOLO모델로 Gradio Streaming webcam의 객체 탐지
import cv2  # OpenCV 라이브러리 임포트
import gradio as gr  # Gradio 라이브러리 임포트
import numpy as np  # NumPy 라이브러리 임포트
from PIL import Image, ImageDraw, ImageFont  # PIL 라이브러리 임포트
import platform  # 현재 운영체제 정보를 확인하기 위한 라이브러리

# YOLO 가중치 파일, 구성 파일, 클래스 이름 파일 경로 설정
weights_path = "yolo3/yolov3.weights"
config_path = "yolo3/yolov3.cfg"
names_path = "yolo3/coco.names"

# YOLO 모델 불러오기
net = cv2.dnn.readNet(weights_path, config_path)

# COCO 클래스 이름 로드
with open(names_path, 'r') as file:
    labels = file.read().strip().split('\n')  # 클래스 이름 리스트로 저장
    print('Labels Length: ', len(labels), labels)  # 라벨 개수와 내용 출력

# 객체 탐지 함수 정의
def detect_object(origin_image):
    backup_image = Image.fromarray(origin_image.copy())  # 원본 이미지를 PIL 형식으로 변환
    draw = ImageDraw.Draw(backup_image)  # 이미지 그리기를 위한 객체 생성

    image = origin_image.copy()[:, :, :3]  # RGBA 이미지를 RGB로 변환
    height, width = image.shape[:2]  # 이미지 높이와 너비 추출

    # YOLO 입력 데이터 전처리
    blob = cv2.dnn.blobFromImage(image, 1/255.0, (416, 416), swapRB=True, crop=False)
    net.setInput(blob)  # YOLO 모델 입력 설정

    # 출력 레이어 이름 가져오기
    layer_names = net.getLayerNames()
    output_layers = [layer_names[i-1] for i in net.getUnconnectedOutLayers()]

    # YOLO 추론 수행
    detections = net.forward(output_layers)

    bounding_box_list = []  # 경계 상자 리스트
    confidence_list = []  # 신뢰도 리스트
    class_index_list = []  # 클래스 인덱스 리스트

    # 탐지 결과 처리
    for output in detections:
        for detection in output:
            score_list = detection[5:]  # 클래스 신뢰도 점수 리스트
            class_index = np.argmax(score_list)  # 가장 높은 점수의 클래스 인덱스
            confidence = score_list[class_index]  # 해당 클래스의 신뢰도

            if confidence > 0.2:  # 신뢰도가 20% 이상일 경우 처리
                bounding_box = detection[:4] * np.array([width, height, width, height])
                center_x, center_y, w, h = bounding_box.astype('int')
                x = int(center_x - w / 2)  # 좌측 상단 x 좌표 계산
                y = int(center_y - h / 2)  # 좌측 상단 y 좌표 계산

                bounding_box_list.append([x, y, w, h])  # 경계 상자 저장
                confidence_list.append(float(confidence))  # 신뢰도 저장
                class_index_list.append(class_index)  # 클래스 인덱스 저장

    # 비최대 억제 적용
    index_list = cv2.dnn.NMSBoxes(bounding_box_list, confidence_list, 0.5, 0.4)
    if len(index_list) > 0:
        index_list = index_list.flatten()

    # 운영체제에 따라 글꼴 설정
    font_size = 15
    if platform.system() == "Darwin":  # MacOS
        font = ImageFont.truetype("AppleGothic.ttf", size=font_size)
    elif platform.system() == "Windows":  # Windows
        font = ImageFont.truetype("malgun.ttf", size=font_size)
    else:  # 기타 OS
        font = ImageFont.load_default()

    # 탐지된 객체들에 대해 경계 상자와 레이블 그리기
    for index in index_list:
        x, y, w, h = bounding_box_list[index]
        confidence = confidence_list[index]
        class_index = class_index_list[index]
        label = labels[class_index]  # 클래스 이름 가져오기

        draw.rectangle((x, y, x + w, y + h), outline="green", width=2)  # 경계 상자 그리기
        draw.text((x + 5, y + 5), text=f"{label} ({(confidence*100):.2f}%)", fill="green", font=font)  # 텍스트 추가

    return backup_image  # 처리된 이미지 반환

# 웹캠 스트리밍 함수 정의
def stream_webcam(image):
    detected_image = detect_object(image)  # 객체 탐지 실행
    return detected_image  # 탐지 결과 이미지 반환

# Gradio UI 생성
with gr.Blocks() as demo:
    webcam_input = gr.Image(label="실시간 화면", sources="webcam", width=480, height=270, mirror_webcam=False)  # 웹캠 입력
    output_image = gr.Image(label="검출 화면", type="pil")  # PIL 형식의 출력 이미지

    # 스트리밍 데이터와 탐지 함수 연결
    webcam_input.stream(fn=stream_webcam, inputs=[webcam_input], outputs=[output_image])

demo.launch()  # Gradio 애플리케이션 실행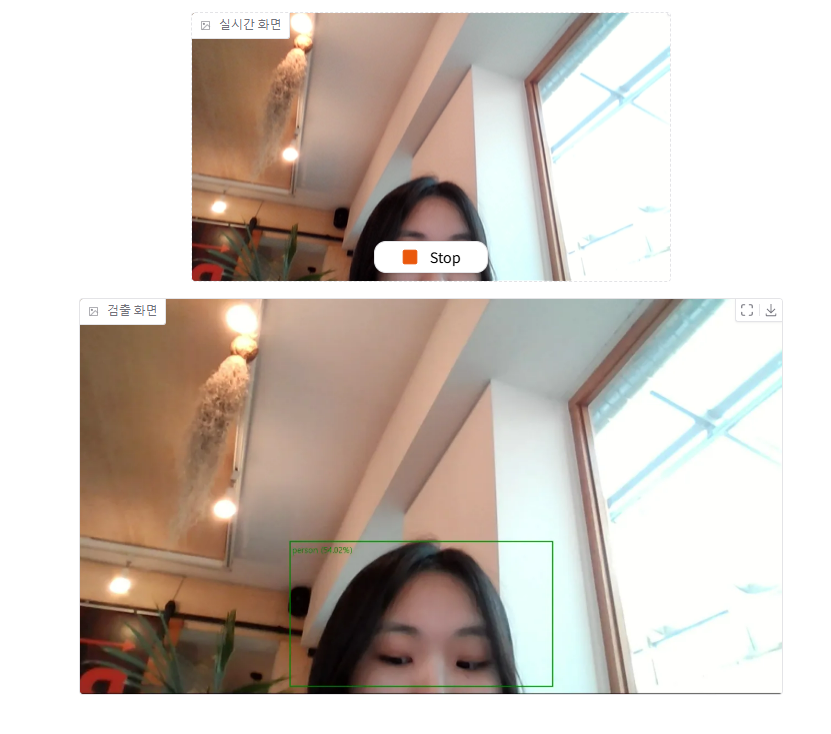
gpt 모델로 불러온 사진에서 감지된 물체에 대한 설명
import cv2  # OpenCV 라이브러리 임포트
import gradio as gr  # Gradio 라이브러리 임포트
import numpy as np  # NumPy 라이브러리 임포트
from PIL import Image, ImageDraw, ImageFont  # PIL 라이브러리 임포트
import platform  # 현재 운영체제 정보를 확인하기 위한 라이브러리
import io
import base64
import requests


############################################################
# YOLOY 관련 전역 변수
############################################################


# YOLO 가중치 파일, 구성 파일, 클래스 이름 파일 경로 설정
weights_path = "yolo3/yolov3.weights"
config_path = "yolo3/yolov3.cfg"
names_path = "yolo3/coco_korean.names"

# YOLO 모델 불러오기
net = cv2.dnn.readNet(weights_path, config_path)

# COCO 클래스 이름 로드
with open(names_path, 'r', encoding="utf-8") as file:
    labels = file.read().strip().split('\n')  # 클래스 이름 리스트로 저장
    # print('Labels Length: ', len(labels), labels)  # 라벨 개수와 내용 출력

##########################################################
# Azure 관련 전역 변수
##########################################################


OPENAI_ENDPOINT = "https://fimtrus-openai.openai.azure.com/"
OPENAI_API_KEY = "5UzY35FZuwcMugyB3YoYuoGlMj8B4LbTqFoTUKpQHb7PzC51zOEVJQQJ99ALACYeBjFXJ3w3AAABACOGGtBh"
DEPLOYMENT_NAME = "fimtrus-gpt-4o"


SPEECH_ENDPOINT = "https://eastus.api.cognitive.microsoft.com/"
SPEECH_API_KEY = "GBonamYKmtWFSbrCHDwtBfVHSP5p9kt2qQGPtdBVzTilLlUnU6h2JQQJ99ALACYeBjFXJ3w3AAAYACOGLLyA"


###########################################################
# OPEN AI
###########################################################

def request_gpt(image_array):
    endpoint = f"{OPENAI_ENDPOINT}/openai/deployments/{DEPLOYMENT_NAME}/chat/completions?api-version=2024-08-01-preview"
    # method
    headers = {
        "Content-Type": "application/json",
        "api-key": OPENAI_API_KEY
    }

    # numpy 이미지를 PIL 형태로 변환
    image = Image.fromarray(image_array)
    # PIL을 Binary 형태로 읽음
    buffered_io = io.BytesIO()
    image.save(buffered_io, format='png')
    # base64 형태로 인코딩. utf-8
    base64_image = base64.b64encode(buffered_io.getvalue()).decode('utf-8')

    # 메세지 설정
    message_list = list()

    # 시스템 메세지
    message_list.append({
        "role" : "system",
        "content" : [{
            "type" : "text",
            "text" : "너는 사진 속에서 감지된 물체에 대해서 분석하는 봇이야."
        }]
    })
    # 유저 메세지
    user_message = """
    너는 물체를 감지하는 YOLO 모델이야.
    이 사진에서 감지된 물체에 대해서 설명해줘.
    반드시 감지된 물체에 대해서만 설명해줘.
    """

    message_list.append({
        "role" : "user",
        "content" : [{
            "type" : "text",
            "text" : user_message
        },{
            "type" : "image_url",
            "image_url" : {
                "url" : f"data:image/png;base64,{base64_image}"
            }
        }]
    })

    payload = {
        "messages": message_list,
        "temperature": 0.7,
        "top_p": 0.95,
        "max_tokens": 1500
    }

    response = requests.post(endpoint, headers=headers, json=payload)

    if response.status_code == 200:
        response_json = response.json()
        content = response_json['choices'][0]['message']['content']
        return content
    else:
        return response.text
    # print(response.status_code, response.text)


###########################################################
# 객체 탐지
###########################################################

# 객체 탐지 함수 정의
def detect_object(origin_image):
    backup_image = Image.fromarray(origin_image.copy())  # 원본 이미지를 PIL 형식으로 변환
    draw = ImageDraw.Draw(backup_image)  # 이미지 그리기를 위한 객체 생성

    image = origin_image.copy()[:, :, :3]  # RGBA 이미지를 RGB로 변환
    height, width = image.shape[:2]  # 이미지 높이와 너비 추출

    # YOLO 입력 데이터 전처리
    blob = cv2.dnn.blobFromImage(image, 1/255.0, (416, 416), swapRB=True, crop=False)
    net.setInput(blob)  # YOLO 모델 입력 설정

    # 출력 레이어 이름 가져오기
    layer_names = net.getLayerNames()
    output_layers = [layer_names[i-1] for i in net.getUnconnectedOutLayers()]

    # YOLO 추론 수행
    detections = net.forward(output_layers)

    bounding_box_list = []  # 경계 상자 리스트
    confidence_list = []  # 신뢰도 리스트
    class_index_list = []  # 클래스 인덱스 리스트

    # 탐지 결과 처리
    for output in detections:
        for detection in output:
            score_list = detection[5:]  # 클래스 신뢰도 점수 리스트
            class_index = np.argmax(score_list)  # 가장 높은 점수의 클래스 인덱스
            confidence = score_list[class_index]  # 해당 클래스의 신뢰도

            if confidence > 0.2:  # 신뢰도가 20% 이상일 경우 처리
                bounding_box = detection[:4] * np.array([width, height, width, height])
                center_x, center_y, w, h = bounding_box.astype('int')
                x = int(center_x - w / 2)  # 좌측 상단 x 좌표 계산
                y = int(center_y - h / 2)  # 좌측 상단 y 좌표 계산

                bounding_box_list.append([x, y, w, h])  # 경계 상자 저장
                confidence_list.append(float(confidence))  # 신뢰도 저장
                class_index_list.append(class_index)  # 클래스 인덱스 저장

    # 비최대 억제 적용
    index_list = cv2.dnn.NMSBoxes(bounding_box_list, confidence_list, 0.5, 0.4)
    if len(index_list) > 0:
        index_list = index_list.flatten()

    # 운영체제에 따라 글꼴 설정
    font_size = 15
    if platform.system() == "Darwin":  # MacOS
        font = ImageFont.truetype("AppleGothic.ttf", size=font_size)
    elif platform.system() == "Windows":  # Windows
        font = ImageFont.truetype("malgun.ttf", size=font_size)
    else:  # 기타 OS
        font = ImageFont.load_default()

    # 탐지된 객체들에 대해 경계 상자와 레이블 그리기
    for index in index_list:
        x, y, w, h = bounding_box_list[index]
        confidence = confidence_list[index]
        class_index = class_index_list[index]
        label = labels[class_index]  # 클래스 이름 가져오기

        draw.rectangle((x, y, x + w, y + h), outline="green", width=2)  # 경계 상자 그리기
        draw.text((x + 5, y + 5), text=f"{label} ({(confidence*100):.2f}%)", fill="green", font=font)  # 텍스트 추가

    return backup_image  # 처리된 이미지 반환


##########################################################
#  GRDIO 화면 구성
##########################################################


# 웹캠 스트리밍 함수 정의
def stream_webcam(image):
    detected_image = detect_object(image)  # 객체 탐지 실행
    return detected_image  # 탐지 결과 이미지 반환

# Gradio UI 생성
with gr.Blocks() as demo:
    webcam_input = gr.Image(label="실시간 화면", sources="webcam", width=480, height=270, mirror_webcam=False)  # 웹캠 입력
    output_image = gr.Image(label="검출 화면", type="pil")  # PIL 형식의 출력 이미지

    # 스트리밍 데이터와 탐지 함수 연결
    webcam_input.stream(fn=stream_webcam, inputs=[webcam_input], outputs=[output_image])

# demo.launch()
# image = Image.open("image/고양이사진.jpg")


# image_np = np.array(image)
# stream_webcam(image_np)
image_array = np.array(Image.open("image/고양이사진.jpg"))
request_gpt(image_array)

[출력결과]
'이 사진에서는 고양이가 감지되었습니다. 고양이는 나무로 된 바닥 위에 앉아 있으며, 벽돌 벽을 배경으로 하고 있습니다.'
텍스트를 음성으로 변환하는 TTS 기능 추가
import cv2  # OpenCV 라이브러리 임포트
import gradio as gr  # Gradio 라이브러리 임포트
import numpy as np  # NumPy 라이브러리 임포트
from PIL import Image, ImageDraw, ImageFont  # PIL 라이브러리 임포트
import platform  # 현재 운영체제 정보를 확인하기 위한 라이브러리
import io
import base64
import requests


############################################################
# YOLOY 관련 전역 변수
############################################################


# YOLO 가중치 파일, 구성 파일, 클래스 이름 파일 경로 설정
weights_path = "yolo3/yolov3.weights"
config_path = "yolo3/yolov3.cfg"
names_path = "yolo3/coco_korean.names"

# YOLO 모델 불러오기
net = cv2.dnn.readNet(weights_path, config_path)

# COCO 클래스 이름 로드
with open(names_path, 'r', encoding="utf-8") as file:
    labels = file.read().strip().split('\n')  # 클래스 이름 리스트로 저장
    # print('Labels Length: ', len(labels), labels)  # 라벨 개수와 내용 출력

##########################################################
# Azure 관련 전역 변수
##########################################################


OPENAI_ENDPOINT = "https://fimtrus-openai.openai.azure.com/"
OPENAI_API_KEY = "5UzY35FZuwcMugyB3YoYuoGlMj8B4LbTqFoTUKpQHb7PzC51zOEVJQQJ99ALACYeBjFXJ3w3AAABACOGGtBh"
DEPLOYMENT_NAME = "fimtrus-gpt-4o"


SPEECH_ENDPOINT = "https://eastus.tts.speech.microsoft.com/cognitiveservices/v1"
SPEECH_API_KEY = "GBonamYKmtWFSbrCHDwtBfVHSP5p9kt2qQGPtdBVzTilLlUnU6h2JQQJ99ALACYeBjFXJ3w3AAAYACOGLLyA"


###########################################################
# OPEN AI
###########################################################

def request_gpt(image_array):
    endpoint = f"{OPENAI_ENDPOINT}/openai/deployments/{DEPLOYMENT_NAME}/chat/completions?api-version=2024-08-01-preview"
    # method
    headers = {
        "Content-Type": "application/json",
        "api-key": OPENAI_API_KEY
    }

    # numpy 이미지를 PIL 형태로 변환
    image = Image.fromarray(image_array)
    # PIL을 Binary 형태로 읽음
    buffered_io = io.BytesIO()
    image.save(buffered_io, format='png')
    # base64 형태로 인코딩. utf-8
    base64_image = base64.b64encode(buffered_io.getvalue()).decode('utf-8')

    # 메세지 설정
    message_list = list()

    # 시스템 메세지
    message_list.append({
        "role" : "system",
        "content" : [{
            "type" : "text",
            "text" : "너는 사진 속에서 감지된 물체에 대해서 분석하는 봇이야."
        }]
    })
    # 유저 메세지
    user_message = """
    너는 물체를 감지하는 YOLO 모델이야.
    이 사진에서 감지된 물체에 대해서 설명해줘.
    반드시 감지된 물체에 대해서만 설명해줘.
    """

    message_list.append({
        "role" : "user",
        "content" : [{
            "type" : "text",
            "text" : user_message
        },{
            "type" : "image_url",
            "image_url" : {
                "url" : f"data:image/png;base64,{base64_image}"
            }
        }]
    })

    payload = {
        "messages": message_list,
        "temperature": 0.7,
        "top_p": 0.95,
        "max_tokens": 1500
    }

    response = requests.post(endpoint, headers=headers, json=payload)

    if response.status_code == 200:
        response_json = response.json()
        content = response_json['choices'][0]['message']['content']
        return content
    else:
        return response.text

###########################################################
# Text To Speech(TTS)
###########################################################

def request_tts(text):
    endpoint = SPEECH_ENDPOINT
    headers = {
        "Ocp-Apim-Subscription-key" : SPEECH_API_KEY,
        "Content-Type" : "application/ssml+xml",
        "X-Microsoft-OutputFormat": "audio-16khz-128kbitrate-mono-mp3"
    }
    payload = f"""
    <speak version='1.0' xml:lang='en-US'>
        <voice xml:lang='ko-KR' xml:gender='Female' name='ko-KR-SunHiNeural'>
            {text}
        </voice>
    </speak>
    """

    response = requests.post(endpoint, headers=headers, data=payload)

    if response.status_code == 200:
        file_name = "response_audio.mp3"

        with open(file_name, "wb") as audio_file:
            audio_file.write(response.content)

        return file_name
    else:
        return None
###########################################################
# 객체 탐지
###########################################################

# 객체 탐지 함수 정의
def detect_object(origin_image):
    backup_image = Image.fromarray(origin_image.copy())  # 원본 이미지를 PIL 형식으로 변환
    draw = ImageDraw.Draw(backup_image)  # 이미지 그리기를 위한 객체 생성

    image = origin_image.copy()[:, :, :3]  # RGBA 이미지를 RGB로 변환
    height, width = image.shape[:2]  # 이미지 높이와 너비 추출

    # YOLO 입력 데이터 전처리
    blob = cv2.dnn.blobFromImage(image, 1/255.0, (416, 416), swapRB=True, crop=False)
    net.setInput(blob)  # YOLO 모델 입력 설정

    # 출력 레이어 이름 가져오기
    layer_names = net.getLayerNames()
    output_layers = [layer_names[i-1] for i in net.getUnconnectedOutLayers()]

    # YOLO 추론 수행
    detections = net.forward(output_layers)

    bounding_box_list = []  # 경계 상자 리스트
    confidence_list = []  # 신뢰도 리스트
    class_index_list = []  # 클래스 인덱스 리스트

    # 탐지 결과 처리
    for output in detections:
        for detection in output:
            score_list = detection[5:]  # 클래스 신뢰도 점수 리스트
            class_index = np.argmax(score_list)  # 가장 높은 점수의 클래스 인덱스
            confidence = score_list[class_index]  # 해당 클래스의 신뢰도

            if confidence > 0.2:  # 신뢰도가 20% 이상일 경우 처리
                bounding_box = detection[:4] * np.array([width, height, width, height])
                center_x, center_y, w, h = bounding_box.astype('int')
                x = int(center_x - w / 2)  # 좌측 상단 x 좌표 계산
                y = int(center_y - h / 2)  # 좌측 상단 y 좌표 계산

                bounding_box_list.append([x, y, w, h])  # 경계 상자 저장
                confidence_list.append(float(confidence))  # 신뢰도 저장
                class_index_list.append(class_index)  # 클래스 인덱스 저장

    # 비최대 억제 적용
    index_list = cv2.dnn.NMSBoxes(bounding_box_list, confidence_list, 0.5, 0.4)
    if len(index_list) > 0:
        index_list = index_list.flatten()

    # 운영체제에 따라 글꼴 설정
    font_size = 15
    if platform.system() == "Darwin":  # MacOS
        font = ImageFont.truetype("AppleGothic.ttf", size=font_size)
    elif platform.system() == "Windows":  # Windows
        font = ImageFont.truetype("malgun.ttf", size=font_size)
    else:  # 기타 OS
        font = ImageFont.load_default()

    # 탐지된 객체들에 대해 경계 상자와 레이블 그리기
    for index in index_list:
        x, y, w, h = bounding_box_list[index]
        confidence = confidence_list[index]
        class_index = class_index_list[index]
        label = labels[class_index]  # 클래스 이름 가져오기

        draw.rectangle((x, y, x + w, y + h), outline="green", width=2)  # 경계 상자 그리기
        draw.text((x + 5, y + 5), text=f"{label} ({(confidence*100):.2f}%)", fill="green", font=font)  # 텍스트 추가

    return backup_image  # 처리된 이미지 반환

image_array = np.array(Image.open("image/고양이사진.jpg"))
text = request_gpt(image_array)
request_tts(text)
텍스트를 음성으로 변환하는 TTS 기능 UI에 구현
import cv2  # OpenCV 라이브러리 임포트
import gradio as gr  # Gradio 라이브러리 임포트
import numpy as np  # NumPy 라이브러리 임포트
from PIL import Image, ImageDraw, ImageFont  # PIL 라이브러리 임포트
import platform  # 현재 운영체제 정보를 확인하기 위한 라이브러리
import io
import base64
import requests
from gradio import ChatMessage
import re


############################################################
# YOLOY 관련 전역 변수
############################################################


# YOLO 가중치 파일, 구성 파일, 클래스 이름 파일 경로 설정
weights_path = "yolo3/yolov3.weights"
config_path = "yolo3/yolov3.cfg"
names_path = "yolo3/coco_korean.names"

# YOLO 모델 불러오기
net = cv2.dnn.readNet(weights_path, config_path)

# COCO 클래스 이름 로드
with open(names_path, 'r', encoding="utf-8") as file:
    labels = file.read().strip().split('\n')  # 클래스 이름 리스트로 저장
    # print('Labels Length: ', len(labels), labels)  # 라벨 개수와 내용 출력

##########################################################
# Azure 관련 전역 변수
##########################################################


OPENAI_ENDPOINT = "https://fimtrus-openai.openai.azure.com/"
OPENAI_API_KEY = "5UzY35FZuwcMugyB3YoYuoGlMj8B4LbTqFoTUKpQHb7PzC51zOEVJQQJ99ALACYeBjFXJ3w3AAABACOGGtBh"
DEPLOYMENT_NAME = "fimtrus-gpt-4o"


SPEECH_ENDPOINT = "https://eastus.tts.speech.microsoft.com/cognitiveservices/v1"
SPEECH_API_KEY = "GBonamYKmtWFSbrCHDwtBfVHSP5p9kt2qQGPtdBVzTilLlUnU6h2JQQJ99ALACYeBjFXJ3w3AAAYACOGLLyA"


###########################################################
# OPEN AI
###########################################################

def request_gpt(image_array):
    endpoint = f"{OPENAI_ENDPOINT}/openai/deployments/{DEPLOYMENT_NAME}/chat/completions?api-version=2024-08-01-preview"
    # method
    headers = {
        "Content-Type": "application/json",
        "api-key": OPENAI_API_KEY
    }

    # numpy 이미지를 PIL 형태로 변환
    image = Image.fromarray(image_array)
    # PIL을 Binary 형태로 읽음
    buffered_io = io.BytesIO()
    image.save(buffered_io, format='png')
    # base64 형태로 인코딩. utf-8
    base64_image = base64.b64encode(buffered_io.getvalue()).decode('utf-8')

    # 메세지 설정
    message_list = list()

    # 시스템 메세지
    message_list.append({
        "role" : "system",
        "content" : [{
            "type" : "text",
            "text" : "너는 사진 속에서 감지된 물체에 대해서 분석하는 봇이야."
        }]
    })
    # 유저 메세지
    user_message = """
    너는 물체를 감지하는 YOLO 모델이야.
    이 사진에서 감지된 물체들에 대해서 감지 확률과 함께 매우 자세한 설명해줘.
    반드시 감지된 물체에 대해서만 설명해줘.
    그리고 무조건 한국어로 말해줘.
    """

    # 메시지 설정
    message_list.append({
        "role" : "user",
        "content" : [{
            "type" : "text",
            "text" : user_message
        },{
            "type" : "image_url",
            "image_url" : {
                "url" : f"data:image/png;base64,{base64_image}"
            }
        }]
    })

    # GPT 요청 데이터 생성
    payload = {
        "messages": message_list,
        "temperature": 0.7,
        "top_p": 0.95,
        "max_tokens": 3000
    }

    # OpenAI API 요청
    response = requests.post(endpoint, headers=headers, json=payload)

    if response.status_code == 200:
        response_json = response.json()
        content = response_json['choices'][0]['message']['content'] # GPT 응답 반환
        return content
    else:
        return response.text    # 오류 메시지 반환

###########################################################
# Text To Speech(TTS)
###########################################################

def request_tts(text):
    endpoint = SPEECH_ENDPOINT
    headers = {
        "Ocp-Apim-Subscription-key" : SPEECH_API_KEY,
        "Content-Type" : "application/ssml+xml",
        "X-Microsoft-OutputFormat": "audio-16khz-128kbitrate-mono-mp3"
    }
    payload = f"""
    <speak version='1.0' xml:lang='en-US'>
        <voice xml:lang='ko-KR' xml:gender='Female' name='ko-KR-SunHiNeural'>
            {text}
        </voice>
    </speak>
    """

    # TTS 요청
    response = requests.post(endpoint, headers=headers, data=payload)

    if response.status_code == 200:
        file_name = "response_audio.mp3"

        with open(file_name, "wb") as audio_file:
            audio_file.write(response.content)

        return file_name
    else:
        return None
###########################################################
# 객체 탐지
###########################################################

# 객체 탐지 함수 정의
def detect_object(origin_image):
    backup_image = Image.fromarray(origin_image.copy())  # 원본 이미지를 PIL 형식으로 변환
    draw = ImageDraw.Draw(backup_image)  # 이미지 그리기를 위한 객체 생성

    image = origin_image.copy()[:, :, :3]  # RGBA 이미지를 RGB로 변환
    height, width = image.shape[:2]  # 이미지 높이와 너비 추출

    # YOLO 입력 데이터 전처리
    blob = cv2.dnn.blobFromImage(image, 1/255.0, (416, 416), swapRB=True, crop=False)
    net.setInput(blob)  # YOLO 모델 입력 설정

    # 출력 레이어 이름 가져오기
    layer_names = net.getLayerNames()
    output_layers = [layer_names[i-1] for i in net.getUnconnectedOutLayers()]

    # YOLO 추론 수행
    detections = net.forward(output_layers)

    bounding_box_list = []  # 경계 상자 리스트
    confidence_list = []  # 신뢰도 리스트
    class_index_list = []  # 클래스 인덱스 리스트

    # 탐지 결과 처리
    for output in detections:
        for detection in output:
            score_list = detection[5:]  # 클래스 신뢰도 점수 리스트
            class_index = np.argmax(score_list)  # 가장 높은 점수의 클래스 인덱스
            confidence = score_list[class_index]  # 해당 클래스의 신뢰도

            if confidence > 0.2:  # 신뢰도가 20% 이상일 경우 처리
                bounding_box = detection[:4] * np.array([width, height, width, height])
                center_x, center_y, w, h = bounding_box.astype('int')
                x = int(center_x - w / 2)  # 좌측 상단 x 좌표 계산
                y = int(center_y - h / 2)  # 좌측 상단 y 좌표 계산

                bounding_box_list.append([x, y, w, h])  # 경계 상자 저장
                confidence_list.append(float(confidence))  # 신뢰도 저장
                class_index_list.append(class_index)  # 클래스 인덱스 저장

    # 비최대 억제 적용
    index_list = cv2.dnn.NMSBoxes(bounding_box_list, confidence_list, 0.5, 0.4)
    if len(index_list) > 0:
        index_list = index_list.flatten()

    # 운영체제에 따라 글꼴 설정
    font_size = 15
    if platform.system() == "Darwin":  # MacOS
        font = ImageFont.truetype("AppleGothic.ttf", size=font_size)
    elif platform.system() == "Windows":  # Windows
        font = ImageFont.truetype("malgun.ttf", size=font_size)
    else:  # 기타 OS
        font = ImageFont.load_default()

    # 탐지된 객체들에 대해 경계 상자와 레이블 그리기
    for index in index_list:
        x, y, w, h = bounding_box_list[index]
        confidence = confidence_list[index]
        class_index = class_index_list[index]
        label = labels[class_index]  # 클래스 이름 가져오기

        draw.rectangle((x, y, x + w, y + h), outline="green", width=2)  # 경계 상자 그리기
        draw.text((x + 5, y + 5), text=f"{label} ({(confidence*100):.2f}%)", fill="green", font=font)  # 텍스트 추가

    return backup_image  # 처리된 이미지 반환


##########################################################
#  GRDIO 화면 구성
##########################################################


# 웹캠 스트리밍 함수 정의
def stream_webcam(image):
    detected_image = detect_object(image)  # 객체 탐지 실행
    return detected_image  # 탐지 결과 이미지 반환

# 캡처 버튼 클릭 시 처리 함수 정의
def click_capture(image):
    return image

# GPT 전송 버튼 클릭 시 처리 함수 정의
def click_send_gpt(image_array, histories):
    content = request_gpt(image_array=image_array)

    histories.append(ChatMessage(
        role="assistant",
        content=gr.Image(value=image_array)
    ))
    histories.append(ChatMessage(
        role="assistant",
        content=content
    ))
    return histories

def change_chatbot(histories):
    content = histories[-1]['content']

    # 가-힣a-zA-Z0-9\s%,\. 제외한 나머지 모든 글자를 찾아내서 삭제하기
    pattern = r'[^가-힣a-zA-Z0-9\s%,\.]'
    cleaned_content = re.sub[pattern, '', content]  # 불필요한 문자를 제거

    file_name = request_tts(cleaned_content)    # TTS 요청
    return file_name

# Gradio UI 생성
with gr.Blocks() as demo:

    with gr.Row():
        webcam_input = gr.Image(label="실시간 화면", sources="webcam", width=480, height=270, mirror_webcam=False)  # 웹캠 입력
        output_image = gr.Image(label="검출 화면", type="pil", interactive=False)  # PIL 형식의 출력 이미지
        output_capture_image = gr.Image(label="캡쳐화면", interactive=False)

    with gr.Row():
        capture_button = gr.Button("캡쳐")
        send_gpt_button = gr.Button("GPT로 전송")

    # test_textbox = gr.Textbox(label="test")
    chatbot = gr.Chatbot(label="분석결과", type="messages")
    chatbot_audio = gr.Audio(label="GPT",interactive=False, autoplay=True)

    # 실시간 웹캠 스트리밍 설정
    webcam_input.stream(fn=stream_webcam, inputs=[webcam_input], outputs=[output_image])
    # 캡처 버튼 클릭 시 처리 설정
    capture_button.click(fn=click_capture, inputs=[output_image], outputs=[output_capture_image])
    # GPT 전송 버튼 클릭 시 처리 설정
    send_gpt_button.click(fn=click_send_gpt, inputs=[output_capture_image, chatbot], outputs=[chatbot])
    chatbot.change(fn=change_chatbot, inputs=[chatbot], outputs=[chatbot_audio])

demo.launch()
# image = Image.open("image/고양이사진.jpg")


# image_np = np.array(image)
# stream_webcam(image_np)
# image_array = np.array(Image.open("image/고양이사진.jpg"))
# text = request_gpt(image_array)
# request_tts(text)'Microsoft AI School > Azure Open AI' 카테고리의 다른 글
| openCV face Detection 실습 (0) | 2024.12.09 |
|---|---|
| Azure AI Servies - AI Vision2 (0) | 2024.12.04 |
| Azure AI Servies - AI Vision (0) | 2024.12.04 |
| Azure AI servies - AI Language (0) | 2024.12.03 |
| Azure AI servies - Document Intelligence (0) | 2024.12.02 |
'Microsoft AI School/Azure Open AI' Related Articles
more


